Category

architecture

Photographing an Amazing 3 Story Tall Lobby Sculpture

By abstract art, architecture, artists, Masqueman Photography, Sculpture
In my opinion, most artwork is better seen with one’s own eyes, especially 3-dimensional sculptures. Photographs may not do the original justice since the nature of a photo is to turn the 3-dimensional object into a 2-dimensional “flat” abstraction.
The choices that a photographer makes when capturing the sculpture (such as viewing angle) are “baked into the photograph”. The viewer can only interpret what the photographer chose to show. Enjoying sculptures in person with our own senses, making our own visual discoveries and forming our own opinions will always be the best way to enjoy this type of artwork (at least until virtual reality is indistinguishable from the real world).
On the other hand, photography can be used to enhance sculptures by creating a version of the artwork that is not possible to see in person. A photographer documenting sculptures always takes a risk of adding a layer of his own aesthetic that may not be in line with what the creator of the artwork intended.
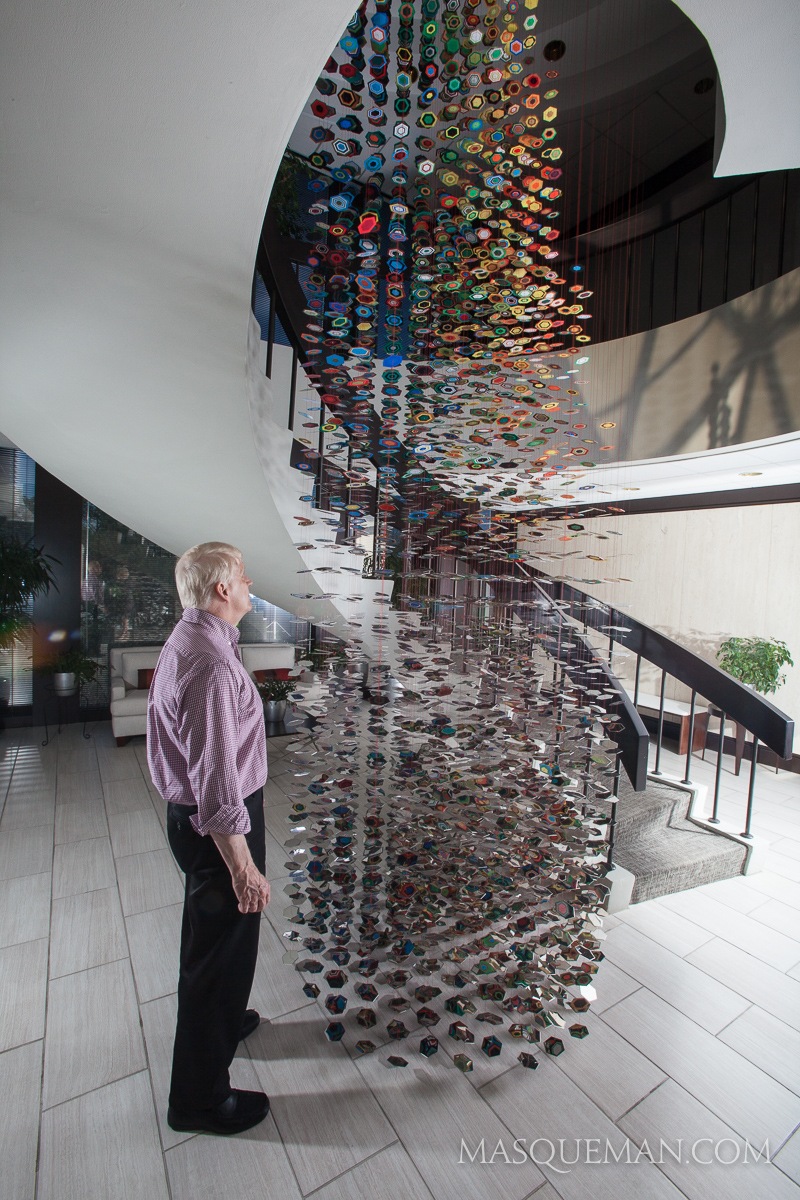
This concern was in the back of my mind when I was asked to photograph an amazing art installation in a client’s lobby. The artwork is permanently attached to the building via a massive hanging system tied into a skylight. I have no idea whether the artist designed it just for the space or if it is something that she has done in other locations.
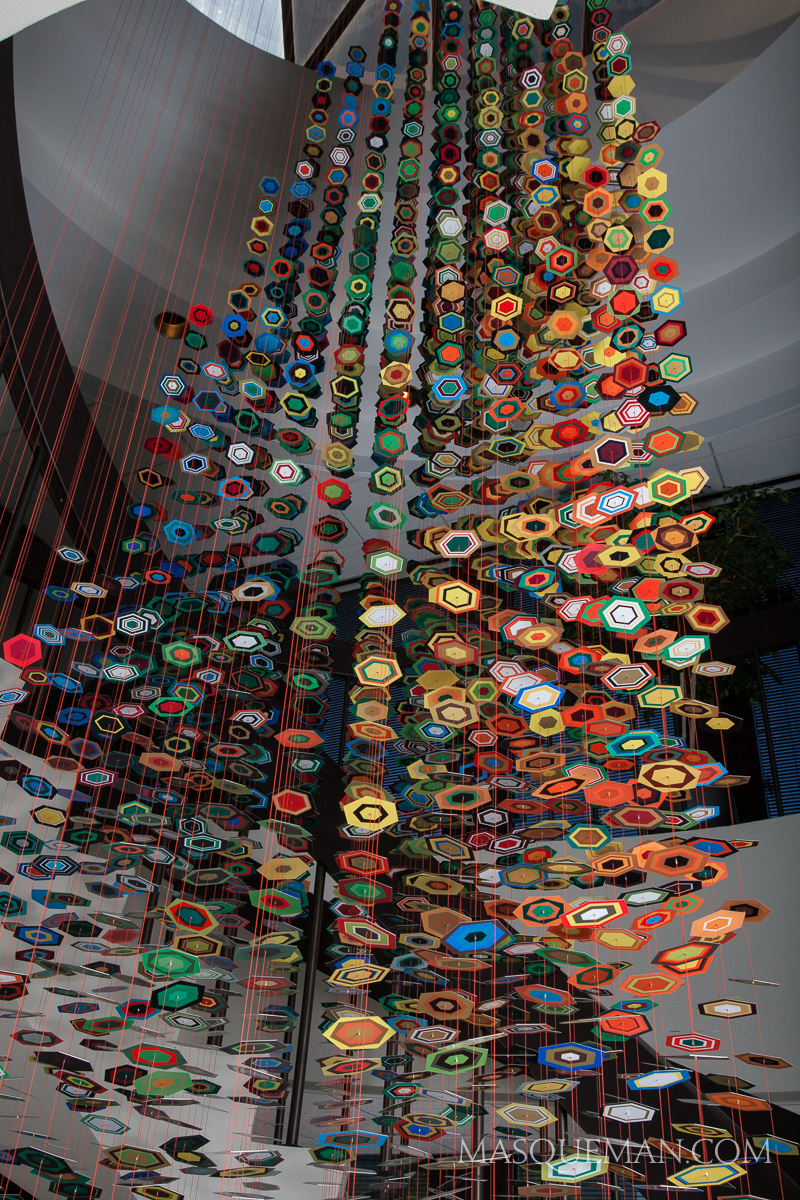
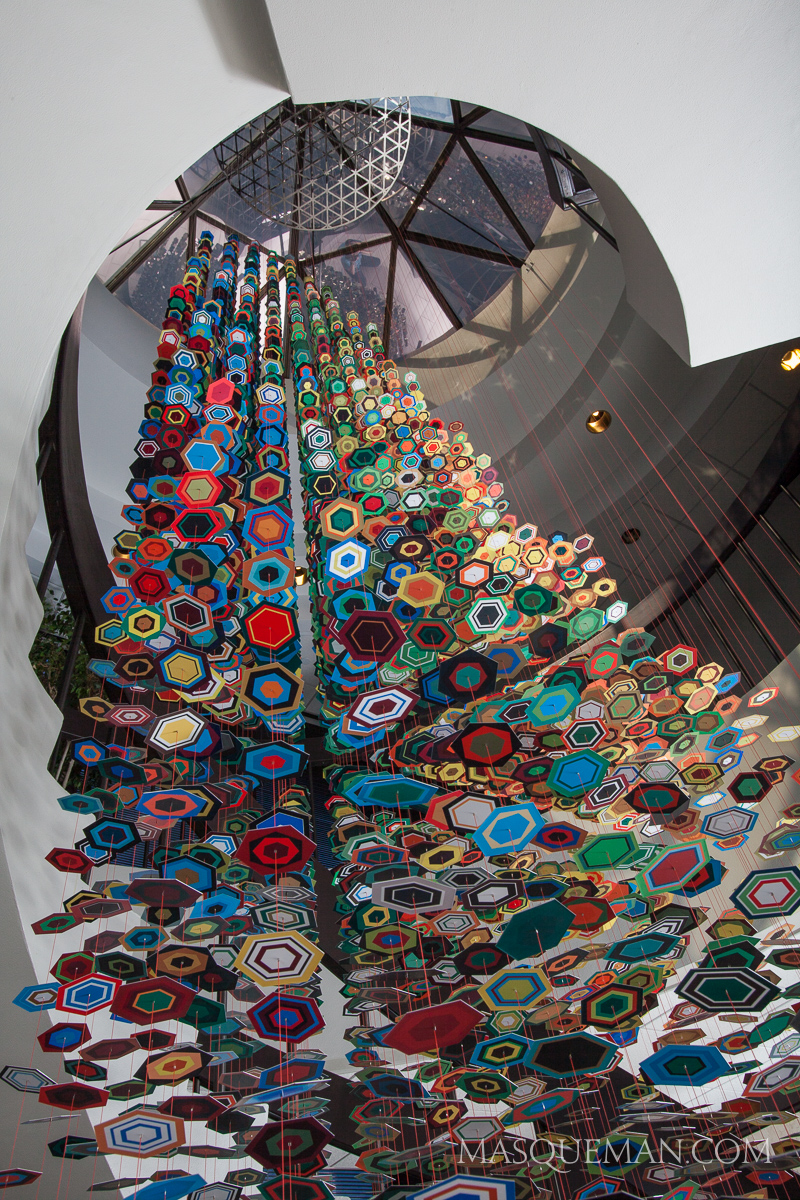
A client installed this wire and mirrored hexagon sculpture that descends from their skylight three stories above down to the first floor entrance.
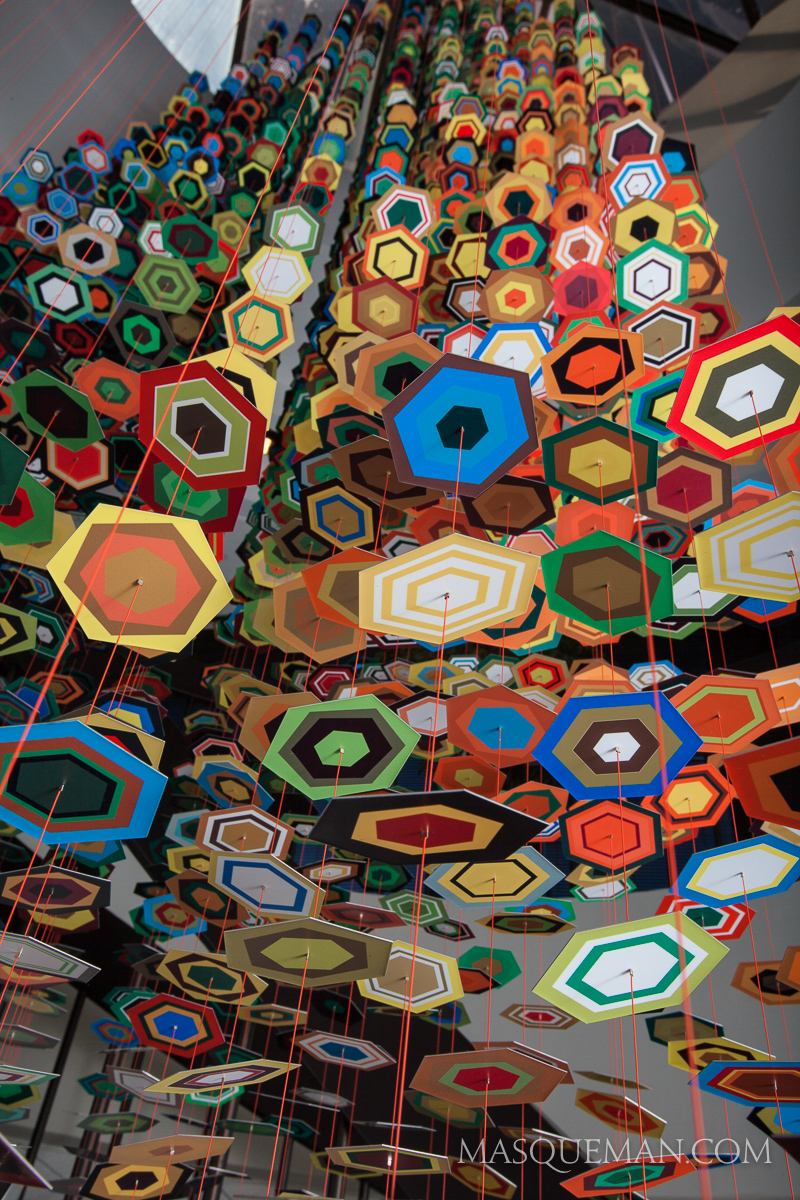
The hexagons are suspended at regular intervals creating planes of color and pattern in all directions.
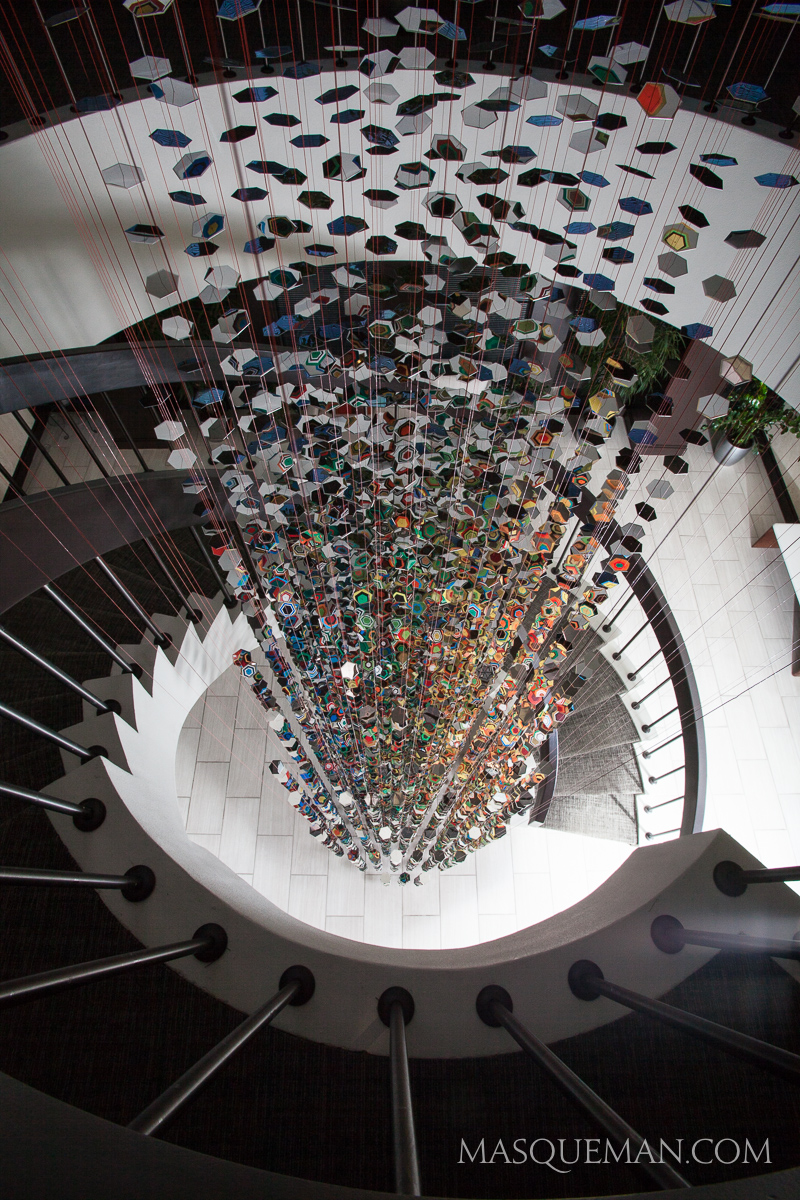
Less than half of the installation is shown in the image below. It fits into the spiral staircase perfectly.
By using flashes, I was able to control the mood of the photo. While my photos make it looks like dusk outside, it was really midday. I could also control the direction of projected shadows adding another layer of dimension to the work. The regular office lighting does not have this effect.
This is simply beautiful.
One of my favorite views was looking up at the links of disks. I did not see a single repeated design.
The view from the top of the staircase reveals reflections of color patterns since all the tiles are mirrored on top. It is similar to looking through a giant shifting kaleidoscope.
I took advantage of the spiral staircase to frame the amazing installation. I imagined some sort of futuristic warp drive in action as I looked at the suspended facets of color.
I believe that the impact of the sculpture is stronger because of where it was installed.
The top of the sculpture seems to come to a point, though this is just an illusion created by the staggered starting points of the hexagon columns.
The red wires play their own part bringing streaks of color into negative spaces around the tiles.
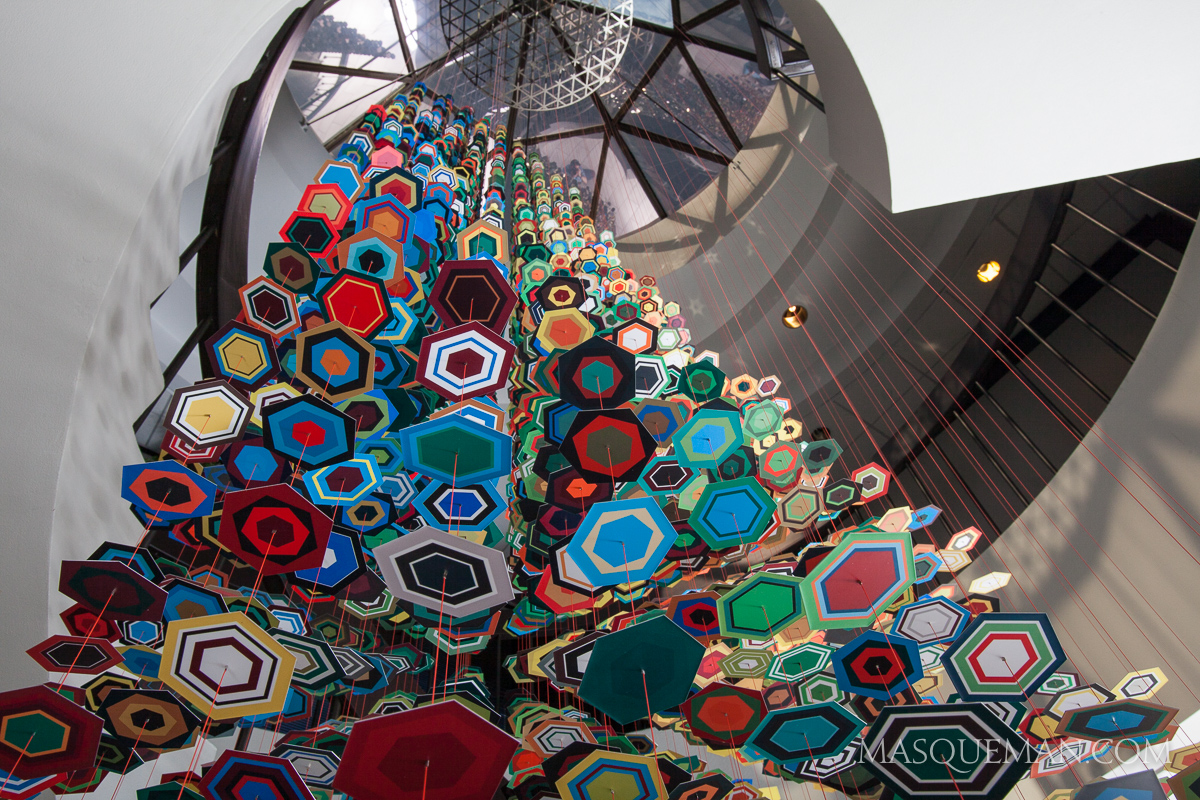
A slight change in perspective shows the fit into the architecture.
By sharing so many views, I am trying to show that this sculpture will offer infinite pleasure and a new experience each time it is encountered.
The sculpture can appear solid or airy depending on whether you are viewing the edges or the tops and bottoms of the hexagons. I would love to have something this cool in my dream home.
I do have one question though… how do you dust something like this?
————————
UPDATE: ABOUT THE ARTIST
Pae White is a multimedia artist known for reinterpreting familiar encounters and ordinary items—like animals, books, advertisements, shopping bags, and plants—and revealing what she calls the “artfulness” of the natural and the everyday. She employs ornate craftsmanship along with inventive materials to create objects and installations that transcend traditional boundaries between art and design. Learn more about Pae White here.

Photographing a Wild In-Home Discotheque for an Audio Visual Company in Atlanta

By architecture, interior photography, Masqueman Photography, Performance AV
I was asked to take photos for a prominent Audio and Visual installation company working in the Atlanta area named Performance Audio and Video. The photographs were needed for an online industry article written about PAV.

If you are the type of person who gets excited about home automation and advanced control of the distributed A/V, heating, lighting, security and window blind components in your house, then you should consider giving them a call. All the information you need is located at www.pavatlanta.com, which is a web site I completed for them last year.

I got a glimpse into what PAV does by taking photos of various installations in a recently renovated mansion in north Atlanta. At first, this may just look like a regular living room. The great thing about the home automation products is that they work in the background, and are accessed using television screens, iPads, iPhones and wall control panels. You may never even know that they are there, until you need them.

The photograph was tricky because I was mixing several different colored light sources with my large  flashes. The room was tight and enclosed with rough hewn divider walls, which essentially determined my choice for viewpoint. Below you can see a little behind-the-scenes of the flashes.  
The other shot needed was for the daddy of all outdoor porches. There are a lot of hidden details here so I am going to mention a few. Along with inline heater units, there are speakers faux-painted to match the wood used in the ceiling. You can barely even see them even a few feet away. There is an outdoor television and fully automated floor to ceiling screens that close the porch off from Atlanta’s famous mosquitoes. We lowered the screens to act darkness the brighter outside yard. They acted like neutral density filters allowing me to make the photograph in one shot.

Normally, several images might need to be composited together since the exposure of the darker porch and the lighter yard is beyond the latitude of my camera’s sensor. I used a couple of flashes the light the foreground area. Below is what the camera would see if I just clicked the shutter.
Behind-the-Scenes: How the camera would see the terrace without my flashes
The last room was quite a challenge. Try to make a photograph of an in-home discotheque that has black walls, a fiber optic star ceiling, mirrored dance floor, DJ booth, VIP couch and a professional level of booming sound, lights, lasers and smoke machine. I had my work cut out for me as you can see in the disco video here.

 Play the video

This disco is intimate and everything can be seen in the wall mirrors. Using a wide angle lens meant that it was difficult to hide my light stands, the camera on a tripod and myself.  Smoke allowed the laser spots and lights to be seen. I might have breathed in a quart of the oil based smoke. Delicious!

If I cannot light something directly, then lighting the space behind it works even better. I added a remote flash that was gelled with pink behind the DJ booth. This gave a focal point to the room.

I asked Jason Caponi of PAV to program the disco lights to slow down and stay in one spot for as long as possible. This was needed because the long exposure combined with the constantly moving lights rendered the colors that you see in the image above practically invisible to the camera sensor. It was quite a balancing act and I am glad that I was able to get something before our time ran out.

Creating an Impromptu Architectural Image for an Atlanta-based Healthcare Company

By Andrew Hughes, architecture, corporate photography, Graphic Works, Masqueman Photography
A photographer must be ready for any hot potato a client throws his direction. It is not always possible to accommodate impromptu requests, but the more versatile I can be, the better.
Perspective corrected image…
While on location setting up a mobile headshot studio for executive portraits, I was asked to make an architectural image of the client’s new building. They had just completed parts of the build-out so this location still had that “new car smell”… and they needed an image the next day.
Outside was dull, dreary and threatening snow. I only had a few moments to snap some images before I was needed inside. I did the best that I could with the 24-70mm portrait lens I had with me. I normally do not bring my wide-angle 16mm lens to portraits so it was this or nothing.

A tilt shift lens would have been handy to dial out the perspective, but that is a rental for me. As such, I had to remove the extreme perspective in Photoshop. There are limited to what looks realistic. The very first image is what a tilt-shift lens might have produced. I’m not sure which I prefer since the second slightly distorted one looks more epic.

Building with some of the perspective left in…
The light played to my advantage with the foggy overcast sky acting like a giant softbox to evenly illuminate the structure’s facades. The sun was cooperative and placed itself directly behind the building allowing parts of the giant glass tower to be both reflective and transparent. 
Out of camera capture…

Of course, the sky had to be replaced with something better than boring white. Above is the original out-of camera shot… I think I added enough drama to make it work.

Model Room Photos for Melia Atlanta Hotel

By Andrew Hughes, architecture, Atlanta, corporate photography, interior photography, Masqueman Photography, Melia Hotel, photoshop tricks
I was hired by the Melia Hotel in Atlanta to photograph their new model room, a designer’s mockup of what the remodeling will look eventually for other rooms. Photographing architectural interiors can be challenging for many reasons…. finding the right angle, different light sources, cramped spaces, and materials.

The shiny wood paneling reflected everything. This looks great in person, but can be difficult to accurately photograph.

The materials in the room ranged from dark glossy wood paneling and tile to flat white linen and shiny chrome vases. I knew that I would not be able to capture the extreme latitude of the room with a single exposure, so I planned to find the best angle and then lock the scene down on my tripod.

To complicate things, there were at least five different light sources with their own color temperature…. blue daylight, green fluorescents, yellow tungstens, white LEDs and my flashes. Each light source was affecting colors and creating pools of localized color zones.

There were large areas of white in this room which were easily affected by colors of the different light sources.

Since I could not simply gel my flash to match all the light temperatures, I ended up shooting each part of the scene separately and composting them later. This allowed me to expose for highlights, midtones and shadows to create a high-dynamic range photo while controlling the color casts. This also allowed me to combine the bright scene outside the window with the relatively dark interior… impossible to do in one shot.

When lighting rooms with flash, try not to overpower ambient light sources that give the room its character. In the photo above, I shot a flash through the frosted glass shower wall which is a key feature of the room’s swanky design. You can see they spent a lot of money on custom glass walls in the restroom.

I also took photos of the room next door which was more of a standard hotel room. It’s pretty interesting to see the difference between the two. This room had the gauze-like sheer curtain that would have helped tame the other room’s extreme lighting conditions. Oh well.

The last shot looks easy, but it was difficult to hide the flashes while lighting both rooms. Again, the shiny materials revealed all light sources so I had to be sneaky where I put my lighting.

OCI Corporate Headshots & Group Photos

By Andrew Hughes, architecture, corporate photography, Graphic Works, group photography, headshot portraits, location photography, Masqueman Photography, portrait photography
I was recently asked to make headshot portraits for OCI, a chemical company located in Atlanta. Due to hectic client schedules, I took two portraits in our studio and 2 in their offices. They had to match existing photo styles so I took great care in replicating the light and keeping it consistant across two locations. I do this by making anal-retentive measurements of every piece of equipment. I can make the same photo years  later if more shots are needed.

While in their office I also took photos of their new conference room which looks like it would be a great place to get business done or maybe challenge your friends to XBOX 360 on their big display screen.

As a surprise, our client also asked us to also make photos of 5 groups of workers in different departments. This had not been discussed previously, but it provides a great lesson in being prepared. Like many photographers, I tend to load up my car with backup cameras, extra lights and gear for such events. It is better to have too much and be ready than tell a client that I can’t do what they ask.

Instead of picking 7 locations and 7 different setups, we chose 1 location near the front entrance that had metallic mirror tile, mixed color lighting and a brushed aluminum logo. This presented a lighting challenge since any lights that I used would bounce back into to the lens revealing themselves as annoying hotspots. Even my largest umbrella diffusers did not tame the reflections. I decided to bounce the flashes off of the hallways walls to give a soft light. Think of this as the photographic equivalent of a bank shot.

For the top brass, we went very informal which was a refreshing change from stuffy CEO power portraits.